Discover how to properly clean Ortho-K lenses. Empowering your child's self-reliance in myopia control.
You've made the decision to opt for Ortho-K lenses to help your child manage their myopia, and you might be starting to wonder about the proper method for cleaning these lenses and how to teach your child to do it independently.
Before we dive into this topic, let's establish some essential knowledge. Ortho-K lenses, short for Orthokeratology lenses, are specialized contact lenses designed to temporarily reshape the cornea. They offer an effective way to slow down or halt myopia progression, but they also come with a slightly higher risk of eye infections. Therefore, it's vital to understand the proper cleaning techniques to ensure optimal eye health.
There are two primary cleaning systems for Ortho-K lenses: multipurpose solution and hydrogen peroxide systems. In this discussion, we'll focus on the multipurpose solution option, which is the most common choice, especially for young learners.
Necessary cleaning materials and accessories to clean Ortho-K lenses
Here's a list of the necessary cleaning materials and accessories you'll need when cleaning Ortho-K lenses:
Multipurpose Solution: Ensure it is suitable for RGP (rigid gas permeable) contact lenses, not soft lenses. RGP solutions are specially designed for cleaning Ortho-K lenses.
Saline Solution: Used for rinsing and cleaning off the multipurpose solution or debris.
Artificial Tears: These help lubricate the eye and loosen the lenses for easy removal.
Contact Lens Case: Ensure it has compartments for the right and left lenses, and it's easily distinguishable.
A lens Plunger: This handy tool assists in the removal of the lenses.
A large Container: Use this as a work surface to prevent accidental dropping of the lenses down the drain.
Protein Removers (only periodically): These are necessary to remove protein deposits on the lenses.
Steps to clean Ortho-K lenses
Now that you have gathered all the necessary materials, let's proceed with the steps for cleaning your child's Ortho-K lenses:
A. Preparation
- Start with your child to thoroughly wash and dry their hands and clean their face.
- Encourage them to work on a clean, flat surface such as a table or countertop.
- Utilize a large container, rather than the sink, to work over to prevent accidental lens dropping.
- Have them organize all their cleaning materials in a consistent location to establish a routine, which is especially beneficial in the groggy morning hours.
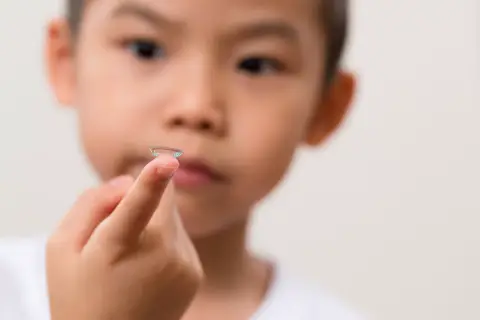
B. Removing Ortho-K lenses
Use artificial tears to help loosen the lenses, and have your child to rotate their eyes to facilitate this process.
Gently remove the lenses using a lens plunger (be patient and practice, as it can be challenging for a child to manipulate an object so close to their eyes while squeezing and releasing the rubber suction at the same time).
If the lenses are sticking firmly, apply additional artificial tears.
Remove both lenses and place them in the contact lens case, ensuring they are in the correct compartments (often marked with R and L for right and left eyes, or with different colored lids).
C. Cleaning the Ortho-K lenses
Instruct your child to place one of the lenses in the palm of their hand, starting with the same eye each time to establish a routine.
Apply a few drops of multipurpose solution to the lens in their hand, enough to cover it, and place some solution into the respective compartment of the contact lens case.
Teach your child to gently rub the lenses with their fingertips, emphasizing not to rub too hard or use their nails, which can scratch the lenses. Cleaning each lens usually takes about 15 - 20 seconds; avoid over-rubbing, as it can scratch the lenses.
Perform the cleaning process over the large container to prevent any dropped lenses from disappearing down the sink.
Place the cleaned lens in the appropriate compartment of the contact lens case and secure the lid to prevent debris from falling in.
Repeat the same cleaning process for the other lens.
D. Final steps
Cap the lens case securely and wipe off any residual water or solution.
Rinse the lens plunger with multipurpose solution, followed by saline. Blot it dry and put it back in its container for future use.
Rinse the large container.
Additional tips
In addition to the cleaning process, here are some additional tips to keep in mind:
1. Replacing Accessories: Ensure you regularly replace the lens case and plunger for hygiene reasons, approximately once every quarter.
2. Protein Removal: Depending on the enzymatic cleaner used, perform protein removal every week to four weeks. Protein deposits on the lenses can lead to discomfort, impaired vision, or allergies.
3. Avoid Press the Lens Upside Down: Be cautious not to apply pressure on the lens when it's upside down, as Ortho-K lenses can be fragile. Always flip them over if they turn upside down to prevent damage.
Conclusion
Teaching your child the proper way to clean their Ortho-K lenses is more than just a morning routine that they master; it's an opportunity to empower them and foster self-reliance. Your child may initially encounter some hiccups or challenges, but with patience and practice, they'll become experts in maintaining their vision health.
Want to stay connected on the newest happening? Join me @
Facebook group: www.facebook.com/groups/myopia/
Pinterest board: https://www.pinterest.com/clearsightcorner/
Comments